A Small Home NAS Build
A Living-Room Compatible File Server
Goal: a low-noise system capable of running TrueNAS, with initially two drives and some room for expansion.
The ODROID-H4 Plus looks interesting: a low-profile Intel N97 system with four SATA ports and Inline ECC available through a BIOS setting. It can run with passive cooling, but active cooling enables running it in Turbo Boost for an extended period. Here are notes on my setup.
Case
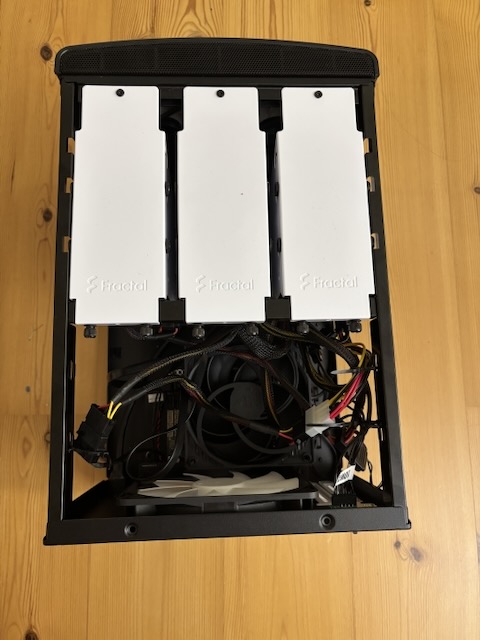
The board is nonstandard but a cheap Mini-ITX kit is available, so we can fit it in a standard case. I like the aesthetics of Fractal Design's Node 304, and it has space for up to six HDDs. Note that the RAM and M.2 slots are on the underside of the board, so there is not much space in a standard case for heatsinks. I used a Glotrends 3mm heatsink for the SSD, and it fits fine.
The case has a number of connectors:
- fan controller: powered by a SATA connector, connects to three preinstalled fans (no closed-loop control: only a manual low/medium/high switch)
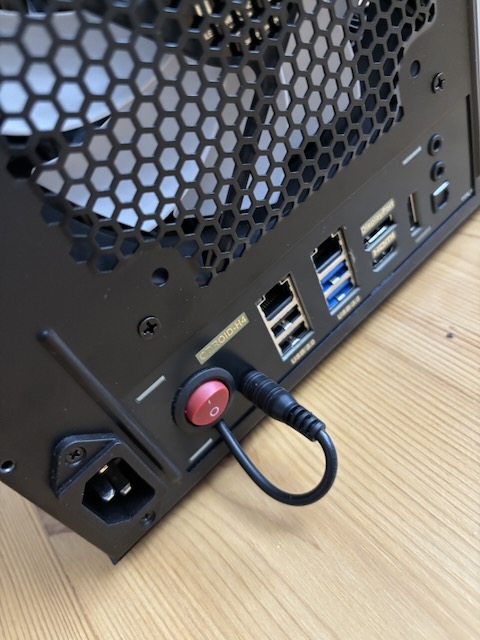
- momentary power button: connect to pins 17 and 19 on the GPIO header (see diagram)
- power LED: connect + to pin 4, - to pin 6
- front-panel audio and USB3: nowhere to connect these
Note that with this setup the case fan keeps running as long as the PSU is powered, i.e., the on/off switch on the back is “on”. The controller has three settings, and at the lowest setting the fan is audible but close to silent. An option might be to not connect the case fans, but it does seem prudent to have some airflow around the HDDs. It is unfortunate that the controller lacks an “off” position, so testing the effect on HDD temperatures would require opening the case and disconnecting the controller.
PSU
The power needs of this system are really low, and the lowest-wattage reasonable PSU I could easily get was the Silverstone ST30SF v2. It has an SFX form factor but comes with an ATX bracket. The Node 304 case positions the PSU so that it pulls air from the bottom of the front of the case, but with the bracket there is some space between the PSU and the bottom. Note that this PSU is not modular, so there is a bunch of extra cables that we need to fold out of the way, but the case does have ample space next to the PSU (where a graphics card might go in another build) or in the space of one of the three HDD brackets (since we can only connect four drives).
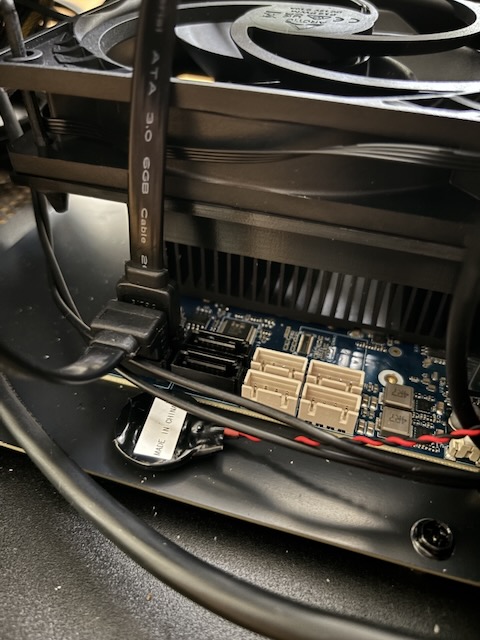
The Mini-ITX kit documentation recommends powering hard drives from the PSU SATA connectors and not from the board, since the kit only provides 12 volts to the board. This PSU only has three SATA connectors and one is used up by the case fan controller, so we need one Molex-to-dual-SATA splitter.
The ODROID board is powered from an external jack, so the Mini-ITX kit comes with an adapter from Molex to the plug. The cable loops via the outside of the case, which looks a bit funny but works.
PWM Fan
This is sufficient to run the system in low power mode, but if we want to use Turbo Boost for extended periods, we need to cool the CPU. The board has a heatsink over the CPU, but it seems too low to benefit from the case fans. This 3D-printable fan adapter fits on top of the heatsink. In the intended orientation, it doesn't fit together with the Mini-ITX kit and the case fan, but I simply flipped it 180°, since there is room in the case. This also makes it easier to fit the SATA connectors.
BIOS settings
- PWM fan: Advanced → Hardware Monitor → Smart Fan Function → Fan Setting, make sure it's in automatic mode; the default parameters seem to be fine (there is also a software control mode but it requires a modified kernel module that hasn't been upstreamed)
- Enable extended Turbo Boost (assuming PWM fan): Advanced → Power & Performance → CPU - Power Management Control → Power Limit 4, set to 48000
- In-Band ECC support (uses 1/8 of your RAM for error correction): Chipset → System Agent (SA) Configuration → Memory Configuration → In-Band ECC Support
- ACPI power on when you flip the on/off button to on: Chipset → PCH-IO Configuration → State After G3, set to S0
Software installation
Get TrueNAS Community Edition, boot to shell, edit /usr/lib/python3/dist-packages/truenas_installer/install.py and change the part where it partitions your boot disk from sgdisk -n3:0:0 to sgdisk -n3:0:+32768M (or however much you want to reserve).
Install TrueNAS. Follow this comment to create and export a separate pool from the rest of the disk. Import it in the TrueNAS UI. Note that this is a single-disk pool without redundancy and that partitioning the boot disk is not supported.
Parts
- ODROID-H4 Plus and the Mini-ITX Kit
- Node 304 case
- Silverstone ST30SF v2 PSU
- One stick of 4800 MT/s DDR5 SO-DIMM RAM; I used the Crucial CT32G56C46S5 which was easily available; reportedly at least 48 GiB works even though the N97 datasheet says 32 GiB
- A Molex to two SATA power connectors splitter
- Up to four SATA hard drives plus data cables; I started with two 8TB drives
- An M.2 PCIe SSD, possibly with a thin heat sink (I used a 1 TB Samsung 970 EVO that I had lying around)
- A 120mm fan and this 3D-printable adapter